Saturday, June 28, 2008

Original hubcaps


My Scout came with these hubcaps and I assume they are the originals as I doubt any of the previous owners would have gone to the trouble to replace them had they been lost. I had the wheels repainted black and I was initially going to go with that look but now that I have the hubcaps back on I think they give the Scout a more classic look.

Posted by Picasa

Thursday, June 26, 2008

Floorboard drain holes

Chip and John drilled holes in the floor then filled them with these expandable plugs to facilitate easy cleaning of the interior. I can basically now just hose it out...

The entire floor and all the inside walls, including the lower half of the door panels, are covered with a sprayed-in polyester liner. This provides a very durable, easy-to-clean surface.

Posted by Picasa

Mounting new emblems

Rather than replacing the original speed clips which attached to pegs on the back of the emblems (the original emblems were missing from my Scout when I purchased it) I found this 3M plastic and emblem adhesive at the local Napa Auto store. It works great and the new refurb'd emblems look good as new and give the Scout really nice finished look.


Posted by Picasa

Identify That Scout - Scout Model Year Changes

This a handy guide to identifying your Scout year model...

GC

Identify That Scout - Scout Model Year Changes
By Howard Pletcher

Here are some of the changes that occurred from year to year that will help identify each year of Scout II production. There are some other changes that could be noted, but these are ones that I could positively identify. Note that the model year change usually took place around July of the previous year.
1971. First production 4/19/71. Grille shell painted body color (pre-production units were dark gray) and had 3 horizontal slots. 4-196, 6-232, 6-258, V-304, and V-345 engines, T13/14 3speed, T44/45 4speed, T-39 Warner Gear Automatic tr ansmissions. FA-13 Dana Model 30, FA-44 Dana Model 44 Front axles, RA-18 standard and RA-28 Trac-loc Dana Model 44 Rear Axles. 3.31, 3.73, and 4.27 ratios available. Spring ratings 2200# and 2400# front, 2000#, 2000#HD, and 2500# progressive rear. Bla ck vinyl upholstery and dash standard, blue, sage, black, and red nylon optional.
1972. Grille shell changed to silver, rear seat back angle revised to be more verticle. 6-232 engine dropped.
1973. Grille changed to vertical bars, divided in the center, painted body color, thin chrome "pencil" trim around halves of grille. Vertical ribs added to rear inner panels to stop drumming (running change during year). 4-196 engine dr opped, T-407 Chrysler automatic transmission and TC-143 chain drive transfer case offered. Finned front brake drums in front, optional console and clock. Spring ratings 2500# front and 2700# rear available. Merchandising kits for optional stripes appea red.
1974. Chrome overlay over the 1973 vertical bar grille, square mirrors replaced round. Dual exhaust standard with V-8s. FA-44 standard (but FA-13s were substituted on some vehicles due to a shortage of FA-44s). Disk brakes standard on front with 6" rims replacing the 5.5" to provide caliper clearance. 7" chrome wheels and radial tires offered. Front sway bar standard on 1/1/97. White and woodgrain vinyl side applique panels, and a wide white stripe applique at the bottom of the side s available.
1975. Same grille as 74, but with square headlight bezels added. XLC (Xtra Load Capacity) model designations introduced to avoid emission requirements of lighter duty models. Spring ratings of 3100# and 3200# on front, and 3100# and 310 0# progressive rears offered to reach the required 6100@ GVW rating. 4-196 engine reintroduced in place of 6-258. V-345A engine with some lighter-duty features replaces standard V-345. 3.07, 3.54, and 4.09 axle ratios offered. T-427/428 4 speeds and T -332 3 speed with synchronized low gears introduced. Tanbark vinyl interior standard, optional Saddle, Tanbark, Parchment, Wedgewood Blue, and Ivy of woven vinyl offered. Woodgrain dash trim, "Mid-high" back bucket seats (from the Chevette), optional lo w-profile rear view mirrors, stainless steel, non-adjustable whip radio antenna (mid-year), 4WD Engaged light, bezels, padded covers on console and rear inner quarters added. Numerous items such as chrome bumpers and locking hubs standard. Side applique was continous rather than seperate panels.
1976. Grille is divided into 3 sections with horizontal bars in each section, chrome overlay standard. Traveler and Terra added. 100" pickup dropped. Non-turbo Nissan diesel offered. New side applique: Rallye, white, cork, and feather s. Rear springs re-arched to make rear sit level. "Selectro/Dualmatic locking hubs optional. Steel fuel filler pipe in place of plastic, Spirit and Patriot models built.
1977. 2 horizontal slots in grille with 3 small verticle supports. Optional interiors now Saddle or Parchment vinyl and Tanbark or Wedgewood Blue nylon. 1/3-2/3 bench seat now folds on driver's side. Black Warn Lock-O-Matic hubs with s pring loaded manual operation available. SSII introduced 3/77. 8" white spoke wheels with hardened front spindles offered.
1978. Same 2 slot grille used, but support bars are blacked out. New arm rests (from S-Series), Prestolite "Common Base" distributor with integral electronic ignition used after 10/6/77. 3.73 rear axle ratio optional, Tiempo All-season tires optional, plastic tail light and marker light housings after 2/78. Lock-O-Matic Hubs have steel ring in manual section replacing plastic 3/6/78. New appliques: Rallye has "hash" marks, white and woodgrain with pattern that varies from front to rea r, stripe is now thin strip between markers. Rustproofing improvements are gradually being made.
1979. Few or no visible exterior changes. New interiors: Black standard, Sierra Tan or Black winylv and Russet or Highland Blue fabric in Custom interior, bolsters on high-back bucket seats, engine-tuned trim on dash, carpeted door panel s with map pockets and carpeted rear quarter panels, vinyl headliner, redesigned console lid with cup holders. Catalytic convert/no-lead fuel required, Thermoquad 4-barrel carb on V345A. TC-143 single speed transfer case dropped. Terra not available as 4x2. Restricted option list for 4-196 engine due to emission certification requirements, Engine oil cooler available. Selective Edition model with Brown or Black paint, SSII grille, gold spoke wheels and Tracker tires, and a gold side strip built.
1980. New plastic grille shell with square headlights. Standard window frames and bumpers are black instead of gray. New caster/camber specs for front axle (2.5 degrees and .5 degrees) to improve front tire wear. 15" styled steering wh eel is standard, Nissan Turbo Diesel offered, polycast wheels, 2.72, 3.31, 3.54, and 3.73 were axle ratios, TC-146 Dana 300 transfer case, new air conditioning housing which is full width of dash (introduced during '79 model year). New applique: Rallye, Waves, Spear, and Flare styles. 85mph speedo head in place of 100mph, Scout decals on rear quarters, stick-on vinyl side trim in place of stainless steel, power steering is standard, black manual locking hubs with Scout id, no T-332 or T-427 deep low tra nsmissions in Traveler, Tartan Blue is blue interior color, brushed satin trim on dash.

Tom's Notes:
T-427/428 4-speeds introduced in '75 were the T19, close and wide gear boxesprior to '75, T-18 non-sync 1st gear close ratio offered.6-232 and 6-258 were AMC motors.T-407 Auto tranny is the Chrysler TorqueFlight 727. Standard Transfer case, TC-145, is a Dana 20.

Hilfiger Scout ad


Note the old Scout they used for this Hilfiger ad out on the salt flats. It looks a lot like mine... same paint color, same mirrors... not sure about the year model?
GC

Monday, June 23, 2008

The 196 Inline 4-cylinder

I found this little article today about the IH 196 while browsing. Kinda interesting so I thought I'd copy it over... GC


Publish date: Oct 1, 2005 By: Alain Hoffmann

This is actually half of the 392 V-8 and at first glance it looks strange enough. Imagine an V-8 where you cut the left half off. It sits there in this enormous engine bay, leaning to the right and looking innocent enough. But don't be fooled, it weights 476 pounds dry and 545 pounds with standard accessories which makes up for a huge chunk of iron for any suspension and frame.

4-196 Technical Data
Bore = 4.125
Stroke = 3.656
Compression = 8.02:1
Power =
86HP@3800rpm
Torque =
157Lb.Ft.@2200rpm
Firing order = 1-3-4-2
Spark plug gap = .030 inch
Initial timing set = TDC*
Idle Speed = 525-575rpm
Max. speed = 4000rpm*TDC (Top Dead Center), timed on #1 cylinder, all vaccum lines off and plugged.


Refer to smog sticker under hood! The four isn't the greatest motor ever made, especially in front of the Chrysler TorqueFlite Automatic. It just plainly lacks power to pull an 3500+ pounds vehicle. It's strong side is it's durability which is no wonder if you consider that it's indeed an 392 that only puts out half the power it's designed for. 300000+ miles should be possible between rebuilts if you change oil regularly.For those in need of more power: The engine is very restricted on it's intake and exhaust side as well as handicaped by the torque- oriented cam and advance curve. A first step would be some slight head work with deburring and light polishing. But don't expect too much from this. Than you can get an exhaust header that will also slightly boost performance. But you're still limited by the small carb if you don't find a way to replace it. The single most rewarding tuning stage in most engines is changing the cam. This will boost performance and make for a much more lively engine. Add to this an recurved distributor and you should end with something around 110HP.The most cost-effective change is surely the swap to an larger V-8 out of the IH-line. These are direct bolt-ons. In fact most parts of the 392 are virtually identical to the 196 with the exception of crank, flywheel and intake manifold. Good V-8 engines can be had for $500.

Sunday, June 22, 2008

Wire harness problem

When I picked up my Scout from Chip for the first time after it's major refurb,. I only managed to get a couple miles down the road before I immediately had engine problems and I had to call in a tow truck to haul me back to Chip's place. With zero hours on the new engine (17,130 on the odo -- that's probably 117, 130 I imagine...), it coulda been any number of things. But Chip and John figured it out rather quickly. The bulkhead connectors had degraded to the point where the wire harnesses would not stay connected. Chip and John were able to quickly rig up a couple of cable ties to hold everything securly in place and I was back on the road in an hour. This fix seems to be working well for now anyway. There are also some burned wires behind the dash and under the hood, so I have placed an order with Super Scouts Specialists for new main dash and engine harnesses as well as new bulkhead connectors. The new harnesseses and connectores should alleviate future problems in these areas. There are also headlight and tailght harnesses on Scouts but all these wires have pretty much just been redone so I don't think they are worth replacing again at this time.

By the way, Super Scout Specialists do these harnesseses the right way. They create them from scratch on pegboards from the original factory blueprints with all the correct connectors, etc. And all the wires are cut to the exact correct length, same as originals. You don't jut get a big bag of assorted connectors and a large spool of wire like most of the other guys out there sell. But the down side is that it does take them 8 to 10 weeks to complete orders for these.

Fuel filters

We were of course concerned about the condition of the fuel tank so Chip and John initially drained out all the old gas, the flushed it several times with new gas before filling it up They then installed a new fuel filter which trapped quite a bit of cast off sediment right away. It took a bit longer for the second filter to fill up with trash. We are now on the third filter and it seems not to be collecting much dirt at all anymore. So the old tank appears to okay for now.
Posted by Picasa

Securing and installing batteries

I upgraded to a no-maintenance gel battery for the primary and we added a secondary dedicated deep cycle gel battery to power the winch. This secondary battery also has a trickle charge system to keep it fully ready at all times. The new battery required the addition of a new tray and clamp on the opposie side of the engine compartment. The old battery just needed a new clamp as the tray was still in decent shape. The guys ran all new wiring to the batteries.
Posted by Picasa

Scout II Emblems

I found these "Scout" and the "II" emblems on ebay for about $28.00 plus shipping. They were repainted by the seller and they look great. All I did was spray them with clearcoat for some added protection and a little more gloss. Now I just need the "International" emblem for the tailgate. I'll keep looking on ebay...
Posted by Picasa

IH emblems

All the original emblems were gone on the Scout when I aquired it. I have been looking for replacements but good ones in good condition are hard to find (like everything else for a 32 year old vehicle). Scoutparts.com does offer a complete set of replacements but at the hefty price of $296.00 I thought I'd continue my search. I found a pair of "IH" emblems on ebay; the chrome was in decent condition and they still had their mounting pegs, but the paint was pretty far gone. But for $10.00 plus shipping, I figured I could make them work. I bought a can of International red spray paint for a few dollars and I already had some good black paint. I then carefully masked off the emblems in stages and sprayed them. I gave them a clear coat finish for added protection. The final results are pretty good I think, especially for the price.
Posted by Picasa

Rollin' "safari style"

The best thing about the soft top is its flexibility. In the hot part of the summer, I like to roll "safari style" with the sides and the back rolled up. It let's in plenty of breeze but keeps the sun off your head. The only problem I'm having with the top is with the adhesive on the back of the Velcro system for securing the top down on the sides and back. I may just try to relace the Velcro with snaps to see if that holds it better.
Posted by Picasa

Receiver hitch

I had receivers mounted into both the front and back bumpers when I had them fabricated. These receiver hitches come in handy for a lot of things, like mounitng my deer feeder or bike rack or even actually pulling a trailer. I found this hook at Northern Tool and Equipment. Since I don't have bow shackles on the rear bumper, this will come in handy for attaching a cable or strap when I need a pull...
Posted by Picasa

Securing the Spare tire

The previous owner added a roll bar and put on larger tires so the original spare tire bracket was no longer long enough to extend through to the lug holes in the wheel. I found a trailer tire mounting kit at Northern Tool and Equipment and with a little modification ( a few washers and some hand bending), it fit the bill. I used the Hi-Lift Jack Off-Road Base to elevate the tire high enough so it would be in the proper position to bolt it on. and it also keeps the base stashed out of the way.
Posted by Picasa

Customized jack storage

The guys fabricated a bracket to hold the Hi-Lift Jack to the floor and another to hold it to the roll bar. Now it stays tucked out of the way.
Posted by Picasa

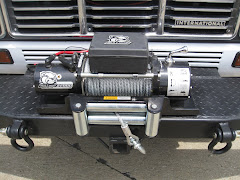
The Bulldog winch

A little more detail on the bulldog winch... what a total BADASS!

Model 10003
$673.00
Rated line pull 12,000 lbs.
Heavy duty steel housing and frame components
Wound 12V DC 6.0hp motor - powers load in and out
Automatic load holding brake
Freespooling clutch (for quick wire rope deployment)
3 stage planetray gear train
265:1 gear ratio
Wire rope 3/8" x 90'
90 lbs. overall weight
Remote hand held with 12' lead;
Also wireless remote...
Posted by Picasa

Finding a replacement grill

The grill was in pretty bad shape but locating a quality replacement was not an easy task. I did find several listed on ebay but they were in just as poor condition as what I already had. I checked out scoutparts.com and found that they did have a used grill for sale. The salesperson told me it was not perfect. It had some small cracks but the chrome still looked very good and the International medallion was sharp, and it was definately a lot better than what I had. He offered me a little discout and I took it. The salesperson did tell me that he has been hearing that a new replacement grill fpr the Scout II based on old tooling might be soon be available. If so, I may consider the upgrade later but what I have now looks pretty good on the old Scout!


Posted by Picasa

Installing the Suspension Lift Kit & Winch

Next, I ordered a suspension system and winch from Rocky Mountain Suspension Products. I found this company on the internet and the salesperson I spoke with there was very knowledgeable about the the products the offered but was also helpful in offering suggestions for my particular requirements. After discussing my intended purposes and usage with the salesperson, I settled on the Rough Country Suspension System for $575.00. It comes complete with heavy duty springs and shocks and provides an additional 4" of lift. Considering this is not a HD rock crawling vehicle but a deer lease creeper, I thought the money I saved was well considered.

I also purchased the 12,000 lb. Bulldog self recovery winch. The winch is mounted to the front bumper using a heavy duty steel mounting plate from Bulldog. Chip and John used huge grade 8 bolts to mount the winch to the bumper so the winch shouldn't be going anywhere. The Bulldog winch is about half the cost of a Warn, with all the same specs except the Bulldog is all metal... no plastic parts!

Posted by Picasa

Saturday, June 21, 2008

Fabricating new front & back bumpers

Our plan for the bumpers included immediately cutting off the old ones as they were really nothing much more than a few pieces of scrap angle iron. They went back to the junk yard from where they had no doubt come. We then designed from scratch, and had James Korte at Wyld Rides Custom Auto in Coppell fabricate, new custom bumpers. They weren't cheap but then again there aren't too many others like theses out there either... these are built very heavy duty indeed. They're made of plate steel on a sturdy all steel tubular frame. And both the front and back bumpers are welded directly to the Scout's frame. There are NO BOLTS in these bad boys! A receiver hitch has been added to both the front and back bumpers for good utility. There's also are a pair of bow shackles on the front bumper. We left plenty of room on the front for the monster winch we would be installing later. A good protective design feature is that these bumpers are about 1/2" wider than the vehicle on each side. This is intended to provide protection to the body from trees or other hard objects in the environment. James figured, "If you can get the bumpers through, you can get the body through!". The results are nothing short of outstanding in my opinion.
Posted by Picasa

A freshly painted Scout

I considered every color from black to tan, even green and blue, but in the end I choose to paint the Scout white. Nissan Cloud White to be exact. Using a photo I took of the Scout, I photoshop "tested" many colors on my computer to see which color seemed most appropriate. White was the only color that worked for me and I am very happy with it. It may not be the most functional color choice for a "hunting rig" as it will impossible to keep clean. But it does look great on the street... clean and sharp! James Korte at Wyld Rides Custom Auto in Coppell did the paint job for me.


Posted by Picasa

New windshield


The windshield was broken by accident when the body was being prepared for painting. I ordered a new seal from scoutparts.com and the guys had the glass man come by for installation. But when he attempted to get it in, he found the seal to be several inches too long. I called scoutsparts.com about it and they reported that, yes they had received a batch a while back that was indeed too big (I returned that seal to them for a credit with no problem). So our local glass man sourced a replacement and we were able to get the windshield within a couple days.

Takin' it down to bare metal

After John at Chip's got the interior sanded down and patched up, he turned his attention to the outside body and started preping it for painting. James over at Wyld Rides, who would be doing the painting later, recommended taking it all the way down to the bare metal and indeed he did. It took quite a while to get all the dings and dents out but he finally got the body ready for paint. The hood had a lot of hail damage and he got most of it out. It's not perfect but it looks pretty darn good.

Posted by Picasa